Context
Recently at 3scale, we had to re-build our customer page to make it more dynamic and easy to maintain. For now it was a classic Wordpress post, with html code in it. Really hard to maintain anytime we had to add a new customer or change its information.
As I was in charge of the project, I immediately thought about all the magic stuff I played around in Meteor. Stuff like dynamic view update when data changes in database and Handlebar Templating. But part of the requirements was to build something using Wordpress without using any iframe. Meteor apps were out of the game…
At that time an article about using Google Spreadsheet as a backend-system got a bit of hype, so we decided to try that. It has the advantage no not neccesitate any coding experience from the person maintaining the spreadsheet, perfect for this project.
To make the page dynamic and reactive we added Handlebar-like templating and Firebase support. In this article I want to walk you through a step-by-step tiny project so you could also use what’ve done.
Project idea
I am running a great conference soon : MemeCon, a conference about memes. I built a nice one-page website and want my assistant to update the agenda easily.
We let people submit they paper proposal using a Google form, and approved them manually so they could be added on the site.
What you need
- a single page website, I personally used a great template found on StartBootrap.com
- a Google Form and the response spreadsheet
- a Zapier account (Free tier is enough for the demo)
- a Firebase account (Free tier is enough for the demo)
Google Spreadsheet setup
On Google side, once you have configure the form you want, go to the corresponding response sheet (click View Responses).
There we will add a column named Accepted. If a submission is Accepted we will put YES in this column. To make it easier to maintain, let’s setup cells so it will only accept YES or NO as values.
Go to Data>Validation menu. In Criteriat select From list items and put YES, NO in the field and click OK. Once you have done that, you can copy the cell to all the column.
We should be done with Google Spreadsheet.
Firebase
Firebase is an amazing tool to build realtime applications and share the data with all the concurrent users. Here we are going to use it as a fasta backend infrastructure accesible in Javascript. We will only store accepted talks on Firebase.
Once your Firebase is activated, you will need to create an app. Your app will be accessible at YOURAPP.firebaseIO.com.
Click your app name to access Firebase dashboard, called the Forge. That’s where you will your data getting created in real-time. You can also create and modify data manually.
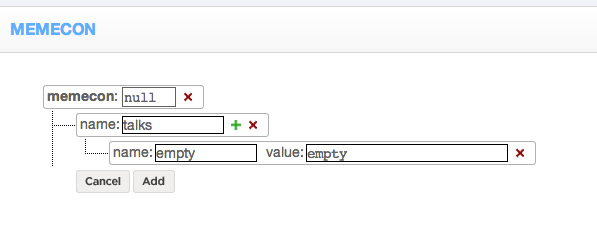
Imagine the data stored as a tree, with roots and leafs. To organize our dataset we want to create a talks root. The best way is to great it under main root and add an empty leaf that you will delete after. To add or delete a node, hover on its name and either click + to add a child node or – to delete the node and its child.
You should have something like this at this point.

We are done with Firebase configuration now.
Zapier
To export data from Google Spreadsheet to Firebase I was too lazy to code and work with Google Webhooks so I found that Zapier will be a good intermediate to do that for me. If you are familiar with IFFT it’s a similar product with more options.
What the Zap will do: everytime a row in the spreadsheet it will add/update a record in Firebase.
- Make a new Zap
- Select Google Doc for the left service, with Updated Spreadsheet Row as a trigger.
- Select Firebase for the right service, with Update/set record ID as a trigger
your should have something like this :

- On step 2 and 3 of the Zap creation, you will have to log on your Google and Firebase accounts, that should be pretty straight forward
- On step 4, you select the spreasheet and the sheet where the responses are
- We add a custom filter on Accepted column so text matches exactly YES to have only accepted submissions
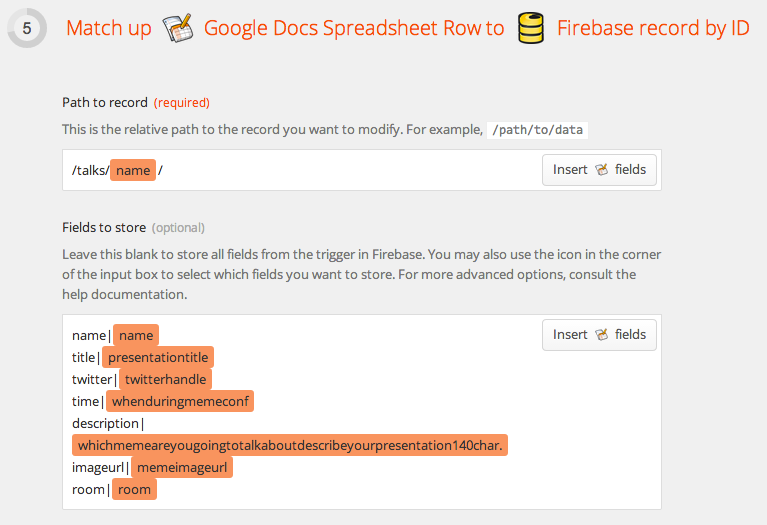
- At step 5 you setup the path as /talks/authorname/ so talks will be listed by their authorname under talks node
fields to store part let you choose which information you want to store. It’s also useful to rename column name.
Mine looks like this

- You can test and name your Zap.
Your test should pass and add a record to Firebase. Check on the Firebase forge to see if it worked. A common problem is that Firebase does not like variable names with special character, and Google Spreadsheet column names are usually called gsx$columnname.
One solution,is to rename columns in the Fields to store part as described here
Website setup
Now that our data are stored on Firebase, we need to get them and display them on the page.
Template
As we are using a static HTML file we can’t use any Handlebar or Moustache templating system that need Node to precompile templates.
Instead I used a solution called Markup.js. Include it in your project like you will do with any other javascript file.
Somewhere in your page, where you want to display submissions add this piece of code
<div id="talks-list"></div>
Then add the end of the file add :
1 2 3 4 5 6 7 8 9 10 11 12 13 14 | |
First line initiate a template named talks-list-template
the {{talks}} ..{{/talks}} block corresponds to a forEach loop on an array talks, in this block each call to another “ THING will be related to the current object in the forEach loop.
For example, by calling {{authorname}} we get the authorame of the current talk oject contained in talks array.
Now we have to pass to this template the corresponding talks object.
Getting data
Add Firebase SDK to your project <script type='text/javascript' src='https://cdn.firebase.com/js/client/1.0.2/firebase.js'></script>
1 2 3 4 5 6 7 8 9 10 11 12 13 14 15 16 17 18 19 20 21 | |
- We initiate the
talksDBobject we the data available athttps://YOURAPP.firebaseio.com/talks - We read the data once. in the case of a realtime app you will use
oninstead - Loop over the data to create an array
- (optional)Sort the array by date (need underscorejs)
- Search for template
talks-list-template, initiatetalksarray with the one just created. - Apply in the div with id
talks-listthe template.
Usage
To try if your app is working well follow these steps: 1. submit info on your Google Form. 2. accept one submit 3. Run Zapier’s Zap manually 4. Check that the talk is added in Firebase Forge 5. Load your static html file
You should see your talk proposal listed. In production you will only need to update the Google Spreadsheet to update your website.
What could be improve
Zapier and Webhooks
If you are less lazy than myself you can find a way to go hover Zapier and hook google spreasheet directly to Firebase. Also, Zapier zaps are run every 15minutes on free tier, so it takes 15minutes to actually update your website. But if you run the zap manually it’s instant.
Security
By default you Firebase data are readable and writable by anybody.
To change that you can go to http://YOURAPP.firebaseio.com in the Security tab and change ".write": true to ".write": false. Zapier will still be able to write into it, but not random users navigating on your website.
More about Firebase Security
Host your whole app on Firebase
Recently Firebase launched a beta program to host static apps directly on their platform. Check the Documentation to learn more.
It might be a great way to deploy prototype, and gets all the perks of Firebase speed.